
Seccomp (short for secure computing mode) is a useful feature provided by the Linux kernel since 2.6.12. It is used to limit the system calls a process can make. Seccomp has been implemented by numerous projects such as Docker, Android, OpenSSH and Firefox to name a few.
In this blog post, I am going to show you how you can take advantage of this Golang security feature by implementing your own seccomp filters, at runtime, for a Go binary on your Dyno.
What is Seccomp?
Seccomp gives developers control over the system calls a process can make. System calls are how processes request services from the Linux kernel. If a Golang binary wants to open a file, it sends a syscall to the kernel—in this case the openat() syscall. The kernel checks the file exists and the process has permission to access it. Then, it allocates a file descriptor the process can use for further syscall requests to read or write to the file.
The Linux kernel has over 400 syscalls, but it’s a Golang security best practice to restrict access to syscalls the program doesn’t need. Doing so stops a bad actor who has compromised the process from accessing key kernel features. That’s the role of seccomp—a process activates a seccomp profile containing seccomp filter rules that say which syscalls it can use. Once the process is in secure computing mode, it cannot use the seccomp-filtered syscalls and nor can any bad actor who may compromise it.
In Golang, seccomp functionality is implemented in libseccomp-golang. It provides a high-level interface to the underlying seccomp filter system. Seccomp filters are usually written in BPF (Berkeley Packet Filter), which allows developers to specify which system calls a process is allowed to make. Seccomp BPF is complex, and libseccomp-golang provides Go-friendly functions and types for implementing Seccomp filtering. In our Golang seccomp example, we’ll explain how to add seccomp security to your binaries.
Why Use Seccomp Filters?
By default, when you run a process on your Dyno, it is limited by which syscalls it can make because the Dyno has been implemented with a restricted set of seccomp filters. This means, for example, that your process has access to syscalls A,B and C and not H and J as defined in the filters for your Dyno. This reduces the overall attack surface* of the Dyno (and is something of a best practice) but what if your process does not make use of syscall A but only needs B and C?
In this case, your process has an unnecessary syscall exposed which increases the attack surface of your process. By limiting the process attack surface, this increases the security posture of your process and if your process were to be compromised in some way, the compromise would be limited by default to the syscalls available to the process. This allows for a layered, defence in depth approach, whereby should one security control fail, another would be able to prevent further damage.
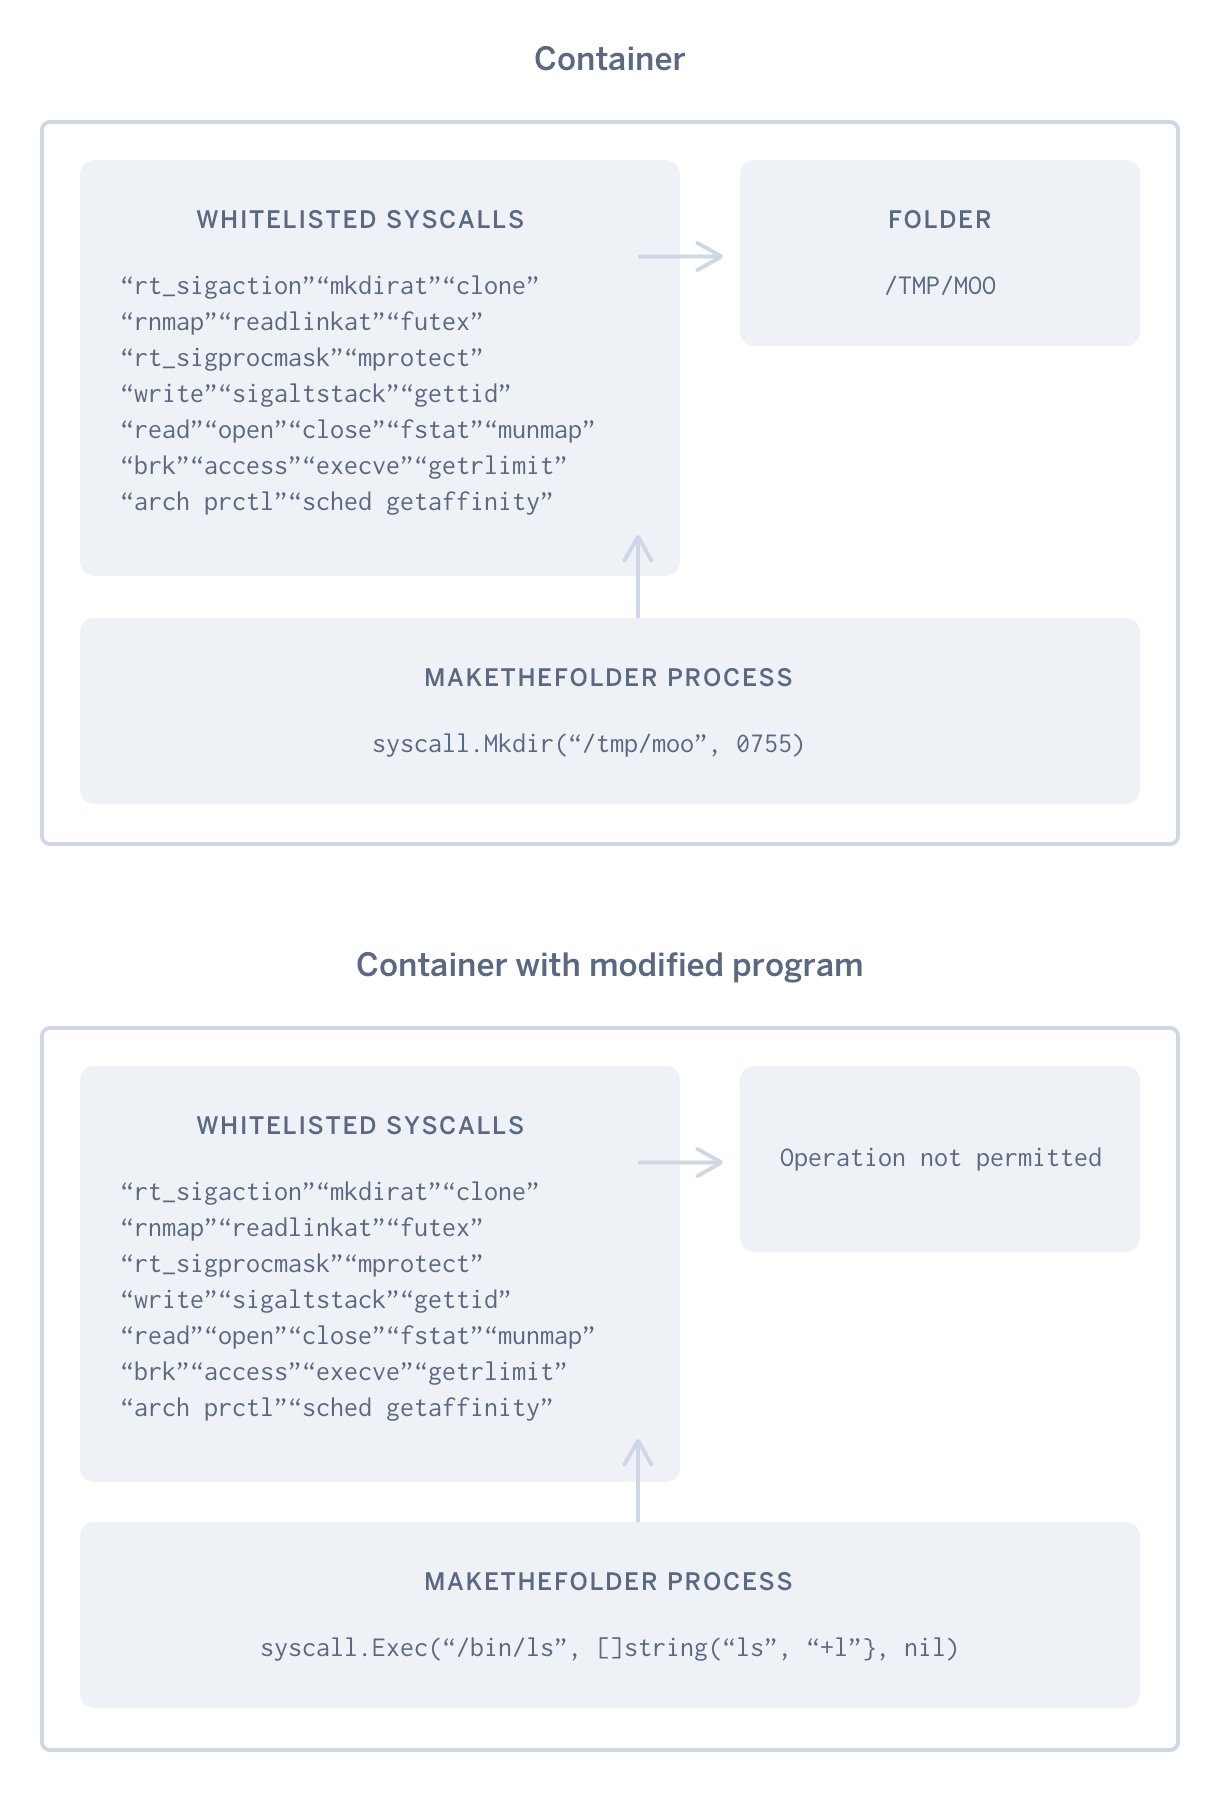
...if we were to create a program [that] was only required to create a folder at a specific location on the file system then we could apply a seccomp filter which would ensure that only the syscalls that are required to create a folder at a specific location are accessible to the program.
For example, if a program only needs to create a folder at a specific file system location, a seccomp filter can be applied to allow just the necessary system calls. The program can perform its intended function without having access to any extra syscalls. However, if the program were to be modified—be it via the source code or some form of code injection—and the program then attempted to establish a network connection (e.g. via curl), then the applied Golang seccomp filter would block this behaviour. This behaviour is blocked because the syscalls required for the network connection have not been added to our program's seccomp filter.
How Can We Enhance Golang Security with Seccomp Filters?
For the remainder of this post, I am going to go work through a seccomp example, showing how to deploy a Go binary and have it implement seccomp filters at runtime.
Firstly we need an application, in this case, I've created a Go program to create a folder at /tmp called moo.
The code for the program is located below:
package main

import (
"fmt"
"syscall"
)

func main() {
    err := syscall.Mkdir("/tmp/moo", 0755)
    if err != nil {
        panic(err)
    } else {
        fmt.Printf("I just created a file\n")
    }
}
We now have a simple Go program to create a folder. As we are working with syscalls, we need to determine what syscalls this program needs to execute successfully. There are multiple ways to determine this, but we will use the application binary and strace. Let's run the following to create the executable binary:
$ go build -o makeTheFolder
We now have the binary and if we execute it, we should get the following output:
$ ./makeTheFolder
I just created a file
We now know that our binary is working and we are going to determine what syscalls are made. To achieve this, we will run the following command:
$ strace -c ./makeTheFolder
The output of the above command will be something like this:
I just created a file
% time seconds usecs/call calls errors syscall
------ ----------- ----------- --------- --------- ----------------
0.00 0.000000 0 3 read
0.00 0.000000 0 1 write
0.00 0.000000 0 4 open
0.00 0.000000 0 4 close
0.00 0.000000 0 4 fstat
0.00 0.000000 0 25 mmap
0.00 0.000000 0 12 mprotect
0.00 0.000000 0 2 munmap
0.00 0.000000 0 3 brk
0.00 0.000000 0 120 rt_sigaction
0.00 0.000000 0 11 rt_sigprocmask
0.00 0.000000 0 5 5 access
0.00 0.000000 0 4 clone
0.00 0.000000 0 1 execve
0.00 0.000000 0 1 getrlimit
0.00 0.000000 0 2 sigaltstack
0.00 0.000000 0 1 arch_prctl
0.00 0.000000 0 1 gettid
0.00 0.000000 0 1 futex
0.00 0.000000 0 1 sched_getaffinity
0.00 0.000000 0 1 set_tid_address
0.00 0.000000 0 1 mkdirat
0.00 0.000000 0 1 readlinkat
0.00 0.000000 0 1 set_robust_list
------ ----------- ----------- --------- --------- ----------------
100.00 0.000000 210 5 total
From the output above, we have a list of the syscalls that were executed by our makeTheFolder binary. Next we need to use our syscall list in such a way that when our binary is executed, its process only has access to the syscalls it requires. To achieve this we will use seccomp, more specifically, we will be making use of the Go library libseccomp-golang which is the Go bindings for libseccomp.
We will need to check if our local system supports seccomp and has the required dependencies for libseccomp-golang. To check if your kernel supports seccomp, run the following command:
$ grep CONFIG_SECCOMP=/boot/config-$(uname -r)
If your kernel supports seccomp, you should get the following returned:
CONFIG_SECCOMP=y
Additionally, we need to ensure that we have libseccomp-dev installed on our local system. To install this package, we can run the following command:
$ apt-get install libseccomp-dev
At this point, we have everything we need to start using the libseccomp-golang library. The following code will be used to achieve our goal of limiting the syscalls available to our binary at runtime:
package main

import (
    "fmt"
    "syscall"
    libseccomp "github.com/seccomp/libseccomp-golang"
)

func whiteList(syscalls []string) {

    filter, err := libseccomp.NewFilter(libseccomp.ActErrno.SetReturnCode(int16(syscall.EPERM)))
    if err != nil {
        fmt.Printf("Error creating filter: %s\n", err)
    }
    for _, element := range syscalls {
        fmt.Printf("[+] Whitelisting: %s\n",element)
        syscallID, err := libseccomp.GetSyscallFromName(element)
        if err != nil {
            panic(err)
        }
        filter.AddRule(syscallID, libseccomp.ActAllow)
    }
    filter.Load()
}
The code above implements seccomp filters using a whitelist approach. We first apply a “deny all” filter to our seccomp filter which restricts access to all syscalls. This is achieved in this line of code:
filter, err := libseccomp.NewFilter(libseccomp.ActErrno.SetReturnCode(int16(syscall.EPERM)))
The method whiteList expects an array of type string which contains the names of the syscalls that we want our process to have access to. We make use of this list by iterating over the elements and then adding the syscall to our filter whitelist which allows our binary to have access to the syscall name provided.
for _, element := range syscalls {
        fmt.Printf("[+] Whitelisting: %s\n",element)
        syscallID, err := libseccomp.GetSyscallFromName(element)
        if err != nil {
            panic(err)
        }
        filter.AddRule(syscallID, libseccomp.ActAllow)
    }
Once we are done adding our required syscalls to the filter, we then load the filter which applies the filter we just created to our binary at runtime. The code to load our filter is:
filter.Load()
We now have a mechanism to limit which syscalls our process will have access to. To use this in our makeTheFolder program, we add the following code:
package main

import (
"fmt"
"syscall"
)

func main() {
     var syscalls = []string{
     "rt_sigaction", "mkdirat", "clone", "mmap", "readlinkat", "futex", "rt_sigprocmask",
     "mprotect", "write", "sigaltstack", "gettid", "read", "open", "close", "fstat", "munmap",
     "brk", "access", "execve", "getrlimit", "arch_prctl", "sched_getaffinity", "set_tid_address", "set_robust_list"}

    whiteList(syscalls)

    err := syscall.Mkdir("/tmp/moo", 0755)
    if err != nil {
        panic(err)
    } else {
        fmt.Printf("I just created a file\n")
    }
}
Our addition to the code is a string array containing the names of the syscalls we extracted from our strace output, and we use this array when we call the method whiteList(syscalls).
We can now test our modified program using the same steps mentioned above:
$ go build -o makeTheFolder && ./makeTheFolder
The above command provides us with the following output:
[+] Whitelisting: rt_sigaction
[+] Whitelisting: mkdirat
[+] Whitelisting: clone
[+] Whitelisting: mmap
[+] Whitelisting: readlinkat
[+] Whitelisting: futex
[+] Whitelisting: rt_sigprocmask
[+] Whitelisting: mprotect
[+] Whitelisting: write
[+] Whitelisting: sigaltstack
[+] Whitelisting: gettid
[+] Whitelisting: read
[+] Whitelisting: open
[+] Whitelisting: close
[+] Whitelisting: fstat
[+] Whitelisting: munmap
[+] Whitelisting: brk
[+] Whitelisting: access
[+] Whitelisting: execve
[+] Whitelisting: getrlimit
[+] Whitelisting: arch_prctl
[+] Whitelisting: sched_getaffinity
[+] Whitelisting: set_tid_address
[+] Whitelisting: set_robust_list
I just created a file
Segmentation fault (core dumped)
We can verify if our folder was created successfully by running the following command:
$ file /tmp/moo
/tmp/moo: directory
Our process is successfully creating the folder we specified but our process crashed afterwards with what appears to be a Segmentation fault. After much investigation (which is beyond the scope of this blog post), I discovered that this crash was due to the process not having access to the exit_group syscall. I stumbled upon this error when verifying my strace output and noticed that the -c option for strace does not display syscalls that do not have a return type. To verify this, I ran strace again without the -c option and dumped the raw output to file. I used the following command:
$ strace -o output.txt ./makeTheFolder
The content of output.txt looks like this:
.......
mmap(NULL, 8392704, PROT_READ|PROT_WRITE, MAP_PRIVATE|MAP_ANONYMOUS|MAP_STACK, -1, 0) = 0x7fb8fc8e0000
mprotect(0x7fb8fc8e0000, 4096, PROT_NONE) = 0
clone(child_stack=0x7fb8fd0dfff0, flags=CLONE_VM|CLONE_FS|CLONE_FILES|CLONE_SIGHAND|CLONE_THREAD|CLONE_SYSVSEM|CLONE_SETTLS|CLONE_PARENT_SETTID|CLONE_CHILD_CLEARTID, parent_tidptr=0x7fb8fd0e09d0, tls=0x7fb8fd0e0700, child_tidptr=0x7fb8fd0e09d0) = 16335
rt_sigprocmask(SIG_SETMASK, [], NULL, 8) = 0
rt_sigprocmask(SIG_SETMASK, ~[RTMIN RT_1], [], 8) = 0
mmap(NULL, 8392704, PROT_READ|PROT_WRITE, MAP_PRIVATE|MAP_ANONYMOUS|MAP_STACK, -1, 0) = 0x7fb8fc0df000
mprotect(0x7fb8fc0df000, 4096, PROT_NONE) = 0
clone(child_stack=0x7fb8fc8deff0, flags=CLONE_VM|CLONE_FS|CLONE_FILES|CLONE_SIGHAND|CLONE_THREAD|CLONE_SYSVSEM|CLONE_SETTLS|CLONE_PARENT_SETTID|CLONE_CHILD_CLEARTID, parent_tidptr=0x7fb8fc8df9d0, tls=0x7fb8fc8df700, child_tidptr=0x7fb8fc8df9d0) = 16336
rt_sigprocmask(SIG_SETMASK, [], NULL, 8) = 0
rt_sigprocmask(SIG_SETMASK, ~[RTMIN RT_1], [], 8) = 0
mmap(NULL, 8392704, PROT_READ|PROT_WRITE, MAP_PRIVATE|MAP_ANONYMOUS|MAP_STACK, -1, 0) = 0x7fb8fb8de000
mprotect(0x7fb8fb8de000, 4096, PROT_NONE) = 0
clone(child_stack=0x7fb8fc0ddff0, flags=CLONE_VM|CLONE_FS|CLONE_FILES|CLONE_SIGHAND|CLONE_THREAD|CLONE_SYSVSEM|CLONE_SETTLS|CLONE_PARENT_SETTID|CLONE_CHILD_CLEARTID, parent_tidptr=0x7fb8fc0de9d0, tls=0x7fb8fc0de700, child_tidptr=0x7fb8fc0de9d0) = 16337
rt_sigprocmask(SIG_SETMASK, [], NULL, 8) = 0
futex(0x72f7c8, FUTEX_WAIT, 0, NULL) = 0
rt_sigprocmask(SIG_SETMASK, ~[RTMIN RT_1], [], 8) = 0
mmap(NULL, 8392704, PROT_READ|PROT_WRITE, MAP_PRIVATE|MAP_ANONYMOUS|MAP_STACK, -1, 0) = 0x7fb8fb0dd000
mprotect(0x7fb8fb0dd000, 4096, PROT_NONE) = 0
clone(child_stack=0x7fb8fb8dcff0, flags=CLONE_VM|CLONE_FS|CLONE_FILES|CLONE_SIGHAND|CLONE_THREAD|CLONE_SYSVSEM|CLONE_SETTLS|CLONE_PARENT_SETTID|CLONE_CHILD_CLEARTID, parent_tidptr=0x7fb8fb8dd9d0, tls=0x7fb8fb8dd700, child_tidptr=0x7fb8fb8dd9d0) = 16338
rt_sigprocmask(SIG_SETMASK, [], NULL, 8) = 0
readlinkat(AT_FDCWD, "/proc/self/exe", "/home/brompwnie/go/src/github.co"..., 128) = 68
mmap(NULL, 262144, PROT_READ|PROT_WRITE, MAP_PRIVATE|MAP_ANONYMOUS, -1, 0) = 0x7fb8fda88000
mkdirat(AT_FDCWD, "/tmp/moo", 0755) = 0
write(1, "I just created a file\n", 22) = 22
exit_group(0) = ?
+++ exited with 0 +++
The output above contains a list of the syscalls that were executed, their return values and other information. The return value = ? indicates that the syscall exit_group does not have a return value. strace does not display these syscalls with the -c option so it is recommended that you analyze both output formats to ensure that you get all the syscalls needed by the process.
At this point, our process is executing successfully but crashing near the end of execution. To remediate this, we add the exit_group syscall to our list of syscalls to whitelist as shown below:
var syscalls = []string{
"rt_sigaction", "mkdirat", "clone", "mmap", "readlinkat", "futex", "rt_sigprocmask",
"mprotect", "write", "sigaltstack", "gettid", "read", "open", "close", "fstat",
"munmap","brk", "access", "execve", "getrlimit", "arch_prctl", "sched_getaffinity",
"set_tid_address", "set_robust_list", "exit_group"}
We can now rebuild and check if our new whitelist of syscalls works with the following command:
$ go build -o makeTheFolder && ./makeTheFolder
The above command should result in the following output:
[+] Whitelisting: rt_sigaction
[+] Whitelisting: mkdirat
[+] Whitelisting: clone
[+] Whitelisting: mmap
[+] Whitelisting: readlinkat
[+] Whitelisting: futex
[+] Whitelisting: rt_sigprocmask
[+] Whitelisting: mprotect
[+] Whitelisting: write
[+] Whitelisting: sigaltstack
[+] Whitelisting: gettid
[+] Whitelisting: read
[+] Whitelisting: open
[+] Whitelisting: close
[+] Whitelisting: fstat
[+] Whitelisting: munmap
[+] Whitelisting: brk
[+] Whitelisting: access
[+] Whitelisting: execve
[+] Whitelisting: getrlimit
[+] Whitelisting: arch_prctl
[+] Whitelisting: sched_getaffinity
[+] Whitelisting: set_tid_address
[+] Whitelisting: set_robust_list
I just created a file
The output above indicates that our process successfully created the folder moo at the correct location /tmp and exited gracefully.
At this point we have our Go program running locally as required with seccomp filters, which means that when the binary makeTheFolder is executed, its process can only use the syscalls that we specified.
Golang Seccomp in Action
In the previous section, we implemented a whitelist to allow for the program to create a folder moo at /tmp but what would happen if the program were to be modified and attempted to execute the following code?
....
    whiteList(syscalls)

    err := syscall.Mkdir("/tmp/moo", 0755)
    if err != nil {
        panic(err)
    } else {
        fmt.Printf("I just created a file\n")
    }
    err2 := syscall.Exec("/bin/ls", []string{"ls", "-l"}, nil)
}
The code above attempts to run the ls -l command and if it were to be executed from within our seccomp whitelisted program, we would get the following output:
...
[+] Whitelisting: getrlimit
[+] Whitelisting: arch_prctl
[+] Whitelisting: sched_getaffinity
[+] Whitelisting: set_tid_address
[+] Whitelisting: set_robust_list
[+] Whitelisting: exit_group
I just created a file
ls: reading directory '.': Operation not permitted
total 0
The output above tells us that the operation was not permitted, and this operation was the command ls -l, which was executed by syscall.Exec. We did not whitelist the syscalls required for the command ls -l (ioctl, getdents, and statfs) therefore it is not allowed to be executed within the context of our program. We just blocked non-whitelisted syscalls.
How Do We Implement This on Heroku?
We can implement this on Heroku as you would with any other Go program on Heroku. First, make sure you have the dependency libseccomp-golang added to your project via Govendor or Godeps and simply deploy. I made use of Govendor and had the following entry in my vendor.json file:
"package": [
        {
            "checksumSHA1": "bCj0+g9CKyCA90SlDxaPA6+zZeg=",
            "path": "github.com/seccomp/libseccomp-golang",
            "revision": "f6ec81daf48e41bf48b475afc7fe06a26bfb72d1",
            "revisionTime": "2017-06-09T13:46:05Z"
        }
    ],
And there you go. You now know how to implement seccomp filters at runtime for your Go binaries. We have added the necessary packages required such as libseccomp-dev to the build environment so that we can achieve this. You can find the full list of packages available below.
Conclusion
In this blog post, we discussed how you can configure and deploy Go binaries with seccomp at runtime to harden your processes. This allows Go developers to programmatically reduce the attack surface of their deployed processes and allows developers to embrace the “shift left” philosophy for secure Golang software development.
Shoutout
This post and functionality would not have been made possible without Heroku's Build Team adding the required packages to the Heroku stack images. Thank you!
Useful Links
- https://github.com/seccomp/libseccomp-golang
- https://docs.docker.com/engine/security/seccomp/
- https://devcenter.heroku.com/articles/go-dependencies-via-govendor
- https://devcenter.heroku.com/articles/stack-packages
- https://blog.jessfraz.com/post/getting-towards-real-sandbox-containers/
- https://blog.jessfraz.com/post/a-rant-on-usable-security/
- https://man7.org/linux/man-pages/man1/strace.1.html
- https://lwn.net/Articles/656307/
- https://wiki.mozilla.org/Security/Sandbox/Seccomp
- https://www.kernel.org/doc/Documentation/prctl/seccomp_filter.txt
- https://www.devsecops.org/blog/2016/5/20/-security
- https://pkg.go.dev/syscall#Exec